
Z-fold card featuring Wonderful Romance Bundle from Stampin Up!


Hello and welcome to my blog. Today I feature the beautiful Wonderful Romance Bundle with a lovely z-fold card in Petal Pink.

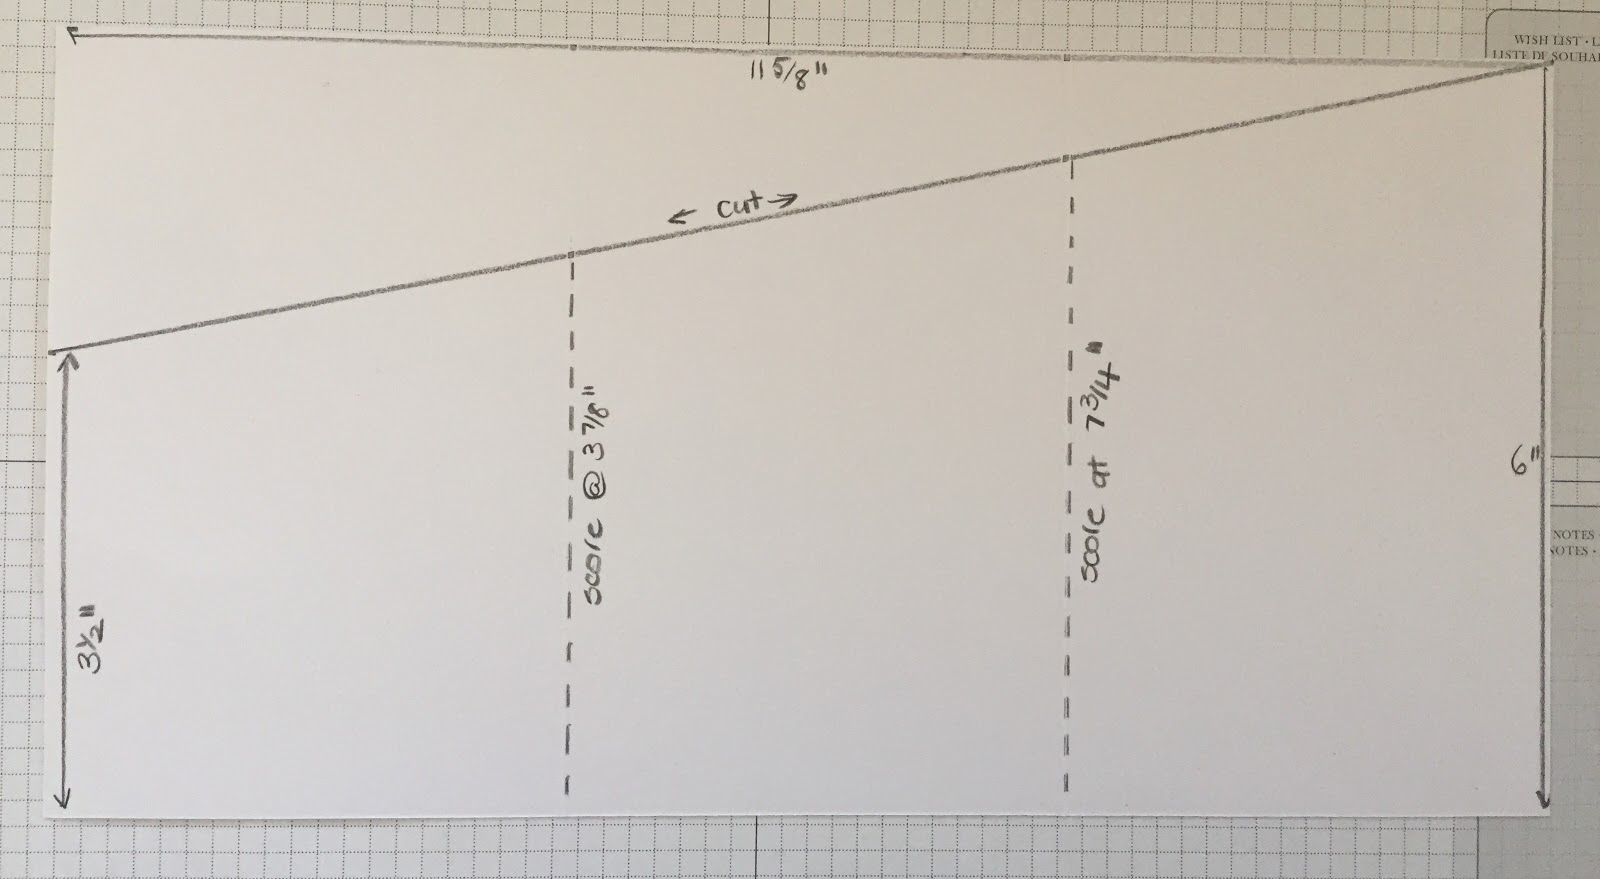
To make this card cut a piece of Petal Pink cardstock 11 5/8" x 6". Score at 3 7/8" and 7 3/4" along the long edge. Mark one 6" edge at 3 1/2" and cut from the opposite top corner to this mark to create angle. See diagram below:


Using a lead pencil draw a light line 1 5/8" from angle. This will be your guide for die cutting the decorative edge.


Using the guide line run the leaf edge die thru your Bigshot, starting at narrow edge. Carefully align the beginning of the die with the end of the previous cut to avoid doubling up.


Remove the small cut outs. Card should look like this.


Cut 3 pieces of matching paper measuring 3 3/4" wide and as high as the highest point of each of the three panels of your card. Here my three panels are 2 5/8" x 3 3/4", 3 1/2" x 3 3/4" and 4 1/4" x 3 3/4".


For each panel of paper align with card, mark the lower point and cut at angle to fit.


Remember that one of your panels will be positioned on the reverse side of your card (which will face forward when card is being displayed) so the angle on this one will be a mirror image of your other panels.


Glue down with Multipurpose Glue. The base of your card is complete, now to decorate!


Using Tuxedo Black ink and the Wonderful Romance stamp set on Whisper White cardstock stamp:
  • One flower bouquet
  • 4 large leaves
  • 2 smaller leaves
  • 8 Small flowers

Colour images with Stampin Blends, markers or watercolour pencils. Here I have used Stampin Blends in Dark Petal Pink, Light Flirty Flamingo and Light Mossy Meadow.


Cut out by hand or using the dies from the bundle. Also cut two oval tags from bundle in Whisper White cardstock.


Decorate the forward facing panels of your card with the die cut images. Here I have stamped one of the oval tags with a sentiment from the stamp set for the front of the card and left the other blank for a handwritten personal message.


Your card is finished. Well done!


To purchase products used in this project pleased go to my online store HERE or click on the individual items below.

Product List

Comments

  1. Julianne, this is a gorgeous card. I have this set and I haven't used it in a while. Thanks for sharing. I will be following your wonderful directions and pictures before long.

    ReplyDelete

Post a Comment

Popular posts from this blog

Reverse gate fold card featuring the Holly Jolly Christmas Bundle from Stampin Up!

Hello and welcome to my blog. Today I feature a reverse gate fold card using the adorable Holly Jolly Christmas Bundle and Night Before Christmas designer series paper. I like the reverse gate fold card as it highlights the central panel allowing the image to really pop out when on display. With normal orientation gate cards the central image is hidden behind the folds. The Holly Jolly Christmas Bundle is wonderful. Santa has so much personality and the other image match perfectly. See the link to my online store at the end of this blog to purchase this bundle and the other products featured in my blogs. To make this card you need cardstock and paper cut as follows:  Cherry Cobbler cardstock 11in x 4 1/8in. Scored at 2 3/4in, 4 1/8in. 6 7/8in and 8 1/4in Very Vanilla cardstock 3 7/8in square. Very Vanilla cardstock 2 layers at 3 7/8in x 2 1/2in Night Before Christmas DSP 3 5/8in square Santa's Workshop DSP 3 5/8in x 2 1/4in Cherry Cobbler cardstock circle 2 7/8in d

Mother’s Day card featuring Tea Together Stamp Set

Hello and welcome to my blog. Today I feature a cute pleat folded paper card with a tea cup fit for high tea with royalty. Perfect for Mothers Day or any occasion requiring a touch of something special. To complete this card you will need to cut: Base card from Mossy Meadow cardstock - 8 1/2 inches x 5 3/4 inches, scored at 4 1/8 inches Petal Pink cardstock 4 inches x 5 5/8 inches (I have used Powder Pink, but Petal Pink would be better) Petal Pink 4 inches x 1 inch Floral Romance Designer Series Paper (or paper of choice) 12 inches x 3 1/2 inches and 2 1/2 inches x 4 inches Floral Romance DSP printed vellum 7/8 inch x 4 inches Whisper White cardstock 4 inches x 5 5/8 inches for inside panel Score larger panel of DSP at 5 1/2 inches and 6 1/2 inches and then at alternating 1/2 inch and one inch intervals to both ends (see diagram below). Please watch my YouTube video for folding and final assembly instructions for this project. The Tea Together Stamp Set, Tea T

February 2020 online class - Painted Poppies

PLEASE NOTE THIS STAMP SET HAS NO SENTIMENTS - MATCH WITH YOUR OWN FAVOURITES TO MAKE CARDS FOR ANY OCCASION  What is an Online Class! An online class is designed to give you the opportunity to craft in the comfort of your own home anytime of the day/night and also gives you the option to build your craft supplies. Each month the online class will feature a stamp set chosen by me. This month I have 5 levels tailored to your needs, whether your a beginner or an avid crafter. Each class comes with access to a VIP Video Tutorial (via Facebook or YouTube) and most include Card Kit ready to complete the months project. All you need is to stamp and stick! Classes are designed assuming that you already have access to some basic craft supplies including adhesives, black ink pad, stamp blocks and scissors. These can be purchased anytime from me online if required. Level 1 - the Full Bundle, Stamp Set and Dies, 1 Classic Stampin Pads and 2 Stampin Blend Combo Packs (4 Blends) plus