
Exploding Box Card featuring Happiness Surrounds Stamp Set and SnowFall ...

Hello and Welcome to my blog.
Today I'm sharing the measurements and products used in this glorious exploding box card. To see the card being assembled please follow the link below to my YouTube channel or go to my Facebook page to watch a replay of the FBLive. Enjoy!

To make this card you need to cut (a lot!):
  • Bermuda Bay cardstock - 8 1/4 inches square, score at 2 3/4 inches and 5 1/2 inches in both directions to form 3x3 grid
  • Bermuda Bay cardstock - 7 7/8 inches square, score at 2 5/8 inches and 5 1/4 inches in both directions to form 3x3 grid
  • Bermuda Bay cardstock - 7 1/2 inches square, score at 2 1/2 inches and 5 inches in both directions to form 3x3 grid
  • For lid, cut 5 inch square of Bermuda Bay cardstock score one inch from each edge and then diagonally from intersection to corner (see pic).

Cut the corner panels from your 3x3 grids to form crosses.


To decorate you need to cut:
  • Silver Foil Sheet - 9 at 2 1/2 square, 4 at 2 3/8 square and 5 at 2 1/4 square
  • Coastal Cabana - 9 at 2 3/8 square, 4 at 2 1/4 square and 5 at 2 1/8 square

Stamp each Coastal Cabana square with the large circular stamp from the Happiness Surrounds Stamp Set using Coastal Cabana Ink. 


Using the dies shown above from the Snowfall Thinlets Set cut 6 large flowers from Bermuda Bay cardstock, 6 medium flowers from Coastal Cabana cardstock and 6 small flowers from solver foil sheet. Assemble layered flowers with liquid glue or glue dots (for less mess).


Now you're ready to assemble. The basic steps are below but please watch my video for more explanation.
  • Glue the bases of your Bermuda Bay crosses together, layering them is reducing size - largest on bottom, smallest on top.
  • Assemble lid by folding corners in along the diagonal score and secure with your favourite adhesive (I've used double sided tape). See video to watch this done.
  • Glue stamped panels to their corresponding silver panel and then to appropriate faces of box - smallest (5) on top layer and base - middle ones (4) on middle layer - largest squares on bottom layer (4) and around the outside and on lid (5).
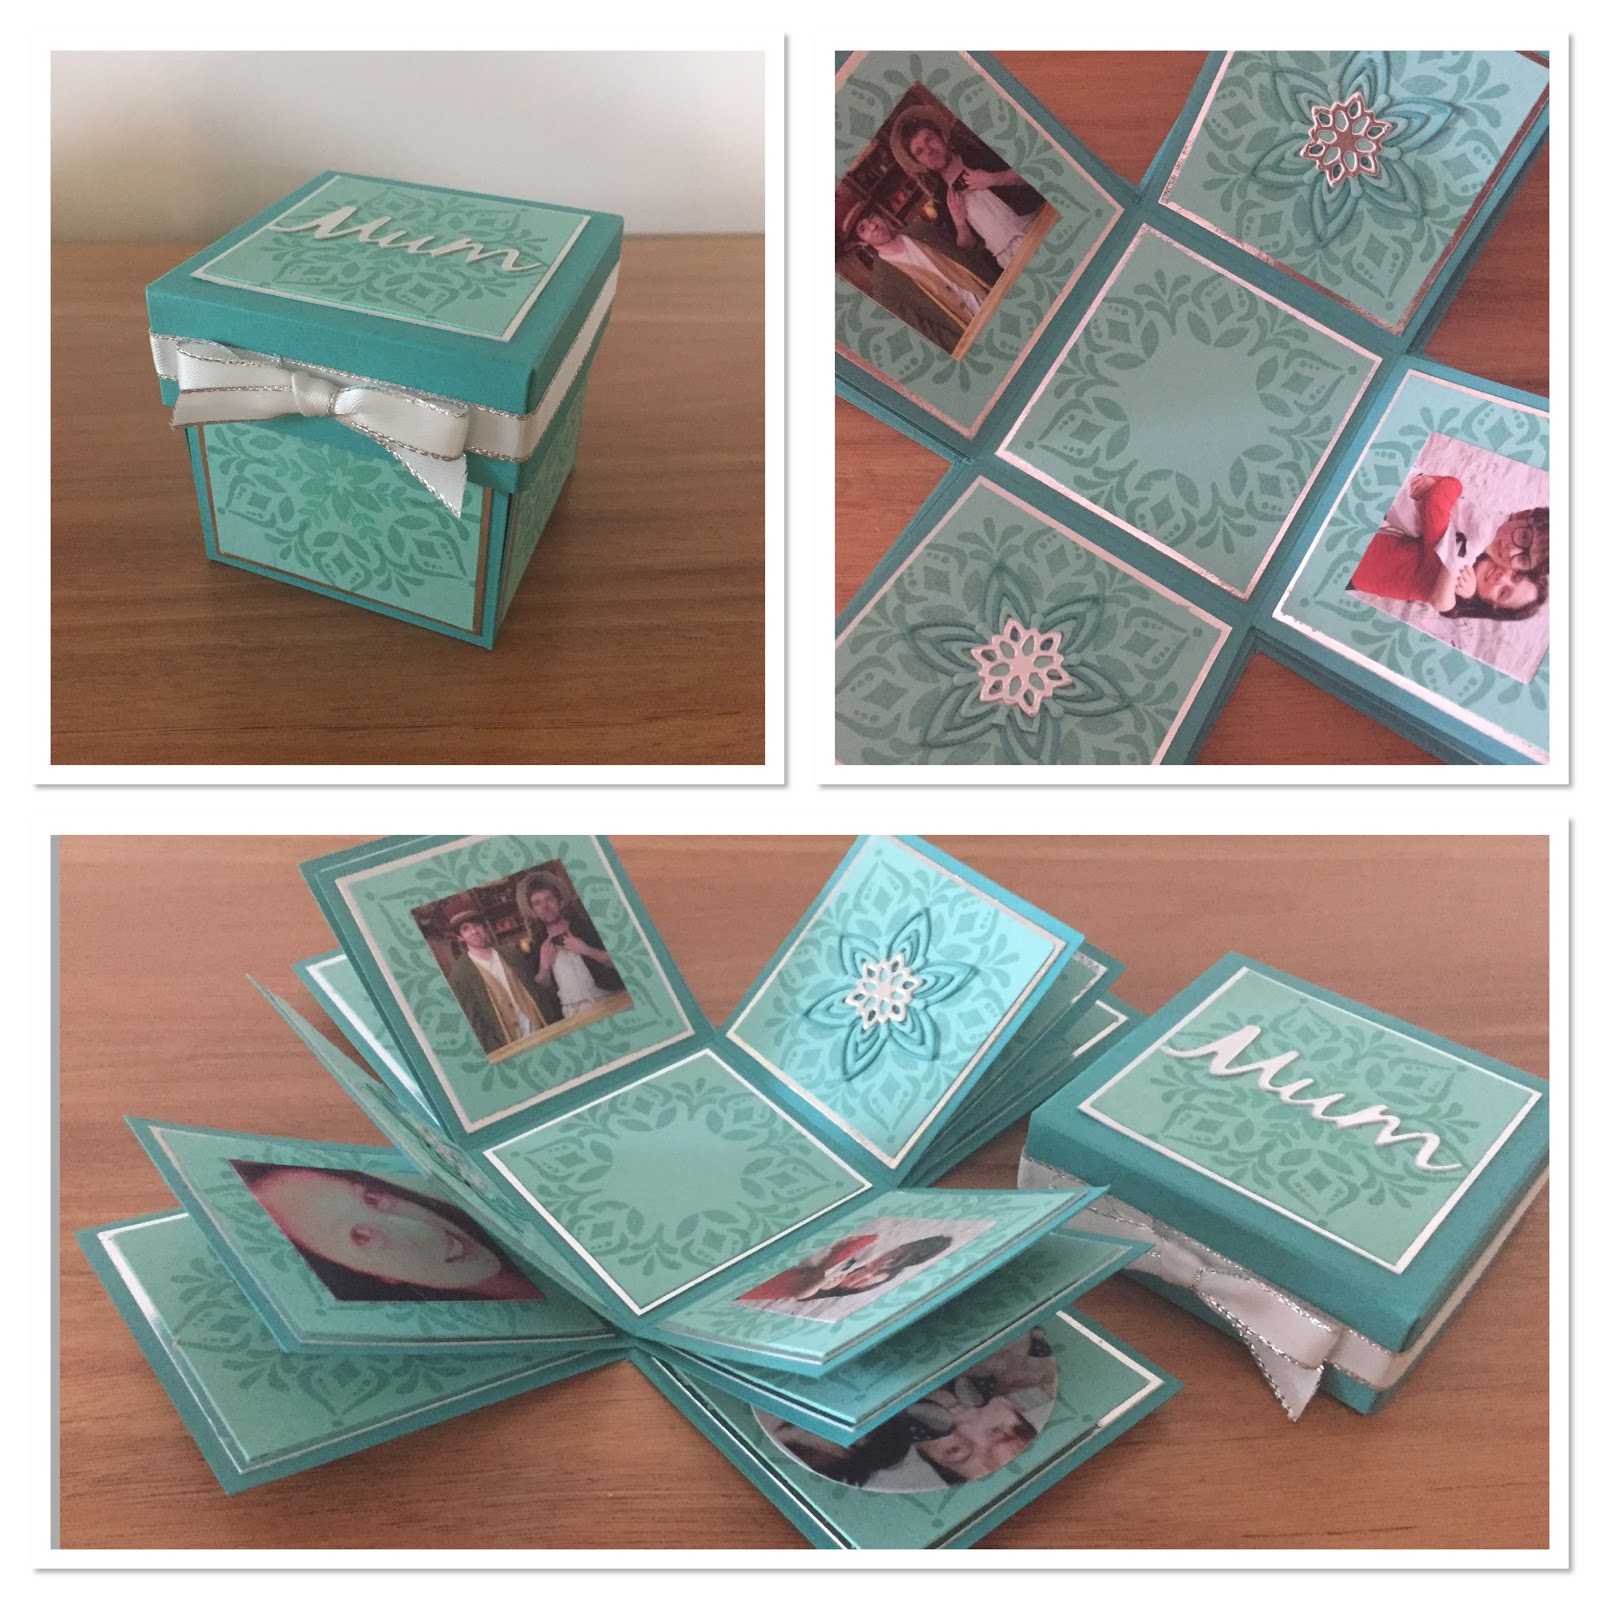
  • Decorate faces as desired. There are 13 faces inside the card in total. I have used 6 for small family photos (cut by hand or using Layered Squares and Layered Circles Framelets) and 6 for our beautiful dies cut flowers. I have left the bottom undecorated as I plan on using card as a gift box. I also added Silver 3/8" Metallic Edge Ribbon around the lid for some added interest. Again I used double sided tape for this.
Finished. Well done!

Again, please watch my video to see me assemble this card step by step. To purchase the products used in this project please see the Product List below or visit my website by clicking HERE

Happy Crafting!


Product List

Comments

Popular posts from this blog

Reverse gate fold card featuring the Holly Jolly Christmas Bundle from Stampin Up!

Hello and welcome to my blog. Today I feature a reverse gate fold card using the adorable Holly Jolly Christmas Bundle and Night Before Christmas designer series paper. I like the reverse gate fold card as it highlights the central panel allowing the image to really pop out when on display. With normal orientation gate cards the central image is hidden behind the folds. The Holly Jolly Christmas Bundle is wonderful. Santa has so much personality and the other image match perfectly. See the link to my online store at the end of this blog to purchase this bundle and the other products featured in my blogs. To make this card you need cardstock and paper cut as follows:  Cherry Cobbler cardstock 11in x 4 1/8in. Scored at 2 3/4in, 4 1/8in. 6 7/8in and 8 1/4in Very Vanilla cardstock 3 7/8in square. Very Vanilla cardstock 2 layers at 3 7/8in x 2 1/2in Night Before Christmas DSP 3 5/8in square Santa's Workshop DSP 3 5/8in x 2 1/4in Cherry Cobbler cardstock circle 2 7/8in d

Mother’s Day card featuring Tea Together Stamp Set

Hello and welcome to my blog. Today I feature a cute pleat folded paper card with a tea cup fit for high tea with royalty. Perfect for Mothers Day or any occasion requiring a touch of something special. To complete this card you will need to cut: Base card from Mossy Meadow cardstock - 8 1/2 inches x 5 3/4 inches, scored at 4 1/8 inches Petal Pink cardstock 4 inches x 5 5/8 inches (I have used Powder Pink, but Petal Pink would be better) Petal Pink 4 inches x 1 inch Floral Romance Designer Series Paper (or paper of choice) 12 inches x 3 1/2 inches and 2 1/2 inches x 4 inches Floral Romance DSP printed vellum 7/8 inch x 4 inches Whisper White cardstock 4 inches x 5 5/8 inches for inside panel Score larger panel of DSP at 5 1/2 inches and 6 1/2 inches and then at alternating 1/2 inch and one inch intervals to both ends (see diagram below). Please watch my YouTube video for folding and final assembly instructions for this project. The Tea Together Stamp Set, Tea T

Christmas card and gift tag featuring #elfie stamp set from Sta...

Hello and welcome to my blog. Today I feature the cute #Elfie stamp set from the 2019 Holiday Catalogue. These little guys are just so gorgeous, colour them with Stampin Blends or watercolour pencils, match with beautiful bright cardstock or designer series paper and you have the perfect Christmas combo. For my cards I have combined Coastal Cabana (1) with Real Read (2)(right) and Pool Party (1) with Cherry Cobbler (2)(left). To make these super easy cards you need: Cut in colour 1 - 11 1/2 inches x 4 1/8 inches, scored at 5 3/4 inches to create portrait card base. Cut in colour 1 - Second largest stitched rectangle Cut in colour 2 - Third largest stitched rectangle Whisper White cardstock - Fourth largest stitched rectangle' Whisper White cardstock 5 5/8 inches x 4 inches (for inside) Real Red or Cherry Cobbler dot paper from the Regals 6x6 designer series paper pack - 1 7/8 inches x 4 inches - cut 2 Stamp the desired image on the whisper white layer in black