
Colourful Seasons Stamp Set and Seasonal Layers Thinlits


Welcome to my blog. Today I have adapted a design from the 2017-2018 Annual Catalogue using the Stampin' Up! Colourful Seasons Stamp set and matching Seasonal Layers Thinlits. The bundle containing both these sets has been retired from 31 May 2018 but they will continue to be available separately in the 2018-2019 Annual Catalogue.


The finished card measures 4 1/8in x 5 3/4in approx. and uses the "Thinking of You" sentiment from the Stamp Set. It is blank inside but could be adapted to any occasion and using any colour in the wonderful Stampin' Up! palette.

To start cut a piece of Berry Burst Colour Theory Designer Paper to 3 7/8 x 5 1/2 inches and mount on a 4in x 5 5/8inch piece of Berry Burst cardstock. Put this piece aside.


Using your Big Shot and the thinlit from the set cut one branch from a light brown coloured cardstock. Here I have used Crumb Cake.


Using white cardstock stamp an assortment of small flowers in coordinating colours. Here I stamped 2 of each of the 3 flower in Berry Burst, Pink Pirouette and Sweet Sugarplum. Cut these flowers out by hand or using thinlits and your Big Shot. Also cut the three more detailed flowers from the thinlit set in white.

Adhere branch diagonally to Berry Burst Designer Paper and then flowers as desired. Create some depth by mounting some flowers on Dimensionals (or other foam squares).


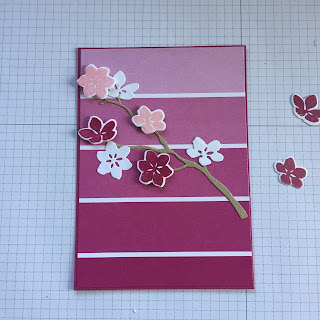
Cut a piece of white cardstock to 4inches x 1/2 inch and stamp with sentiment. I like the effect of multiple sentiments in this case but it's not compulsory. Cut tag end in sentiment either by hand or using Tailored Tag Punch. Fix sentiment so that it JUST covers the base of the branch. 


Add extra flowers and Rhinestone Jewels as desired and mount decorated card top to card base (finished to 4 1/8inch x 5 3/4inch). Finished!


 For everything you need to make this simply beautiful card at home click here.

Now for an amazing offer!

Have you even considered joining Stampin' Up? Would you like a discount when you buy SU products for yourself and maybe include family and friends? Yes? Well, now might be the time to act!

When you sign up as a Demonstrator you get to pick your Starter Kit. Starter Kits are a great value at $169AUD for $235AUD worth of products, and that includes business supplies and free shipping. You will then enjoy a 20% discount on all SU products purchased while you are an active Demonstrator.

To remain active as a Demonstrator you only need to submit 300 CSV (Commissionable Sales Volume) per sales quarter - at time of writing that's about $460AUD quarterly retail sales. As a new Demonstrator this is the first FULL quarter after you join. That means you will actually have 3 to 6 months to fill your first quarterly minimum sales requirement - while enjoying the 20% discount on product. After that, it's up to you - continue as a Demonstrator by meeting your quarterly requirements or revert to a customers - no pressure!

Sound good? Sure does.

If you'd like to enquire about this offer, join my team or purchase SU products please contact me via my SU Demonstrator webpage.


To ensure you don't miss future offers and deals as well as great stamping ideas please subscribe to my blog or visit me on Facebook, @stampinwithjulianne....

Happy crafting!


Comments

Popular posts from this blog

Reverse gate fold card featuring the Holly Jolly Christmas Bundle from Stampin Up!

Hello and welcome to my blog. Today I feature a reverse gate fold card using the adorable Holly Jolly Christmas Bundle and Night Before Christmas designer series paper. I like the reverse gate fold card as it highlights the central panel allowing the image to really pop out when on display. With normal orientation gate cards the central image is hidden behind the folds. The Holly Jolly Christmas Bundle is wonderful. Santa has so much personality and the other image match perfectly. See the link to my online store at the end of this blog to purchase this bundle and the other products featured in my blogs. To make this card you need cardstock and paper cut as follows:  Cherry Cobbler cardstock 11in x 4 1/8in. Scored at 2 3/4in, 4 1/8in. 6 7/8in and 8 1/4in Very Vanilla cardstock 3 7/8in square. Very Vanilla cardstock 2 layers at 3 7/8in x 2 1/2in Night Before Christmas DSP 3 5/8in square Santa's Workshop DSP 3 5/8in x 2 1/4in Cherry Cobbler cardstock circle 2 7/8in d...

Z-fold card featuring Wonderful Romance Bundle from Stampin Up!

Hello and welcome to my blog. Today I feature the beautiful Wonderful Romance Bundle with a lovely z-fold card in Petal Pink. To make this card cut a piece of Petal Pink cardstock 11 5/8" x 6". Score at 3 7/8" and 7 3/4" along the long edge. Mark one 6" edge at 3 1/2" and cut from the opposite top corner to this mark to create angle. See diagram below: Using a lead pencil draw a light line 1 5/8" from angle. This will be your guide for die cutting the decorative edge. Using the guide line run the leaf edge die thru your Bigshot, starting at narrow edge. Carefully align the beginning of the die with the end of the previous cut to avoid doubling up. Remove the small cut outs. Card should look like this. Cut 3 pieces of matching paper measuring 3 3/4" wide and as high as the highest point of each of the three panels of your card. Here my three panels are 2 5/8" x 3 3/4", 3 1/2" x 3 3/4" and 4 1/4...

Birthday and friendship cards featuring the Beautiful Friendship Stamp S...

Hello and welcome to my blog. This Facebook Live features two card designs and the glorious Beautiful Friendship Stamp Set. The first card is a landscape design in Rococo Rose and Very Vanilla cardstock. The ink colours are Rococo Rose, Seaside Spray, Mint Macaron, Call Me Clover and Blackberry Bliss. To make this card you need to cut: Very Vanilla cardstock 8 1/4 inches x 5 3/4 inches, scored half way along long edge. Rococo Rose cardstock 5 1/2 inches x 3 7/8 inches Very Vanilla cardstock 5 3/8 inches x 3 3/4 inches The video shows how to use the masking technique to give the images on this card a wonderful 3D effect. The card can be decorated with rhinestone embellishments and gold embossed sentiment. My second card features Gorgeous Grape and Granny Apple Green cardstock and ink. To make this card you need to cut: Gorgeous Grape cardstock 8 1/4 inches x 5 3/4 inches, scored half way along long edge. Granny Apple Green cardstock 5 1/2 inches x 3 7/8 inches...