Card in a Box featuring cute dinosaurs from the Dino Days Bundle from Stampin Up


Hello and welcome to my blog. Today I combined two of my favourite things - box cards and the DinoRoar Bundle from Stampin' Up!

I was aiming to make a bright colourful Birthday box card which folds flat for easy posting and this one definitely ticks all the boxes.

The box itself is a standard pattern - you could probably find a million templates online - but here are the specifications for this project.

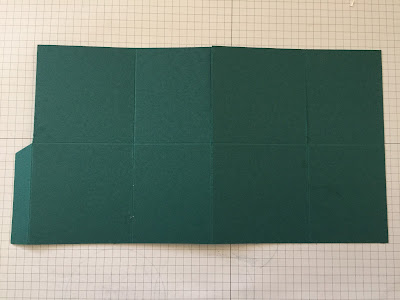
Start with a piece of Pretty Peacock cardstock cut to 5 inches x 9 1/2 inches. Score lengthways in half along the short edge and at 2 1/2 inches, 4 1/2 inches, 7 inches and 9 inches along the long edge. 

Cut to centre on each vertical score line and removed the smallest flap as below. This makes a tab for gluing.


Construct card by gluing tab to opposite end and folding down 3 of the four flaps as shown in the example below.


Cut 2 pieces of matching paper from the DinoRoar Designer Series Paper pack to 1 7/8 inches x 2 3/8 inches and glue to the to side flaps. Cut one piece to 2 3/8 inches square and glue to the front flap.

Using Whisper White cardstock stamp the following:
  • T-Rex body in Lovely Lipstick ink
  • T-Rex spines in Old Olive ink
  • Pterodactyl (the flying one) in Pool Party ink
  • Diplodocus in Mango Melody ink (with dots in Lovely Lipstick ink)
  • Palm trunk in Soft Suede ink
  • Palm fronds in Pretty Peacock ink
  • Sentiment on small stitched rectangle in Lovely Lipstick ink with dino tracks in Old Olive.
Attach sentiment to front flap

Cut a small 1 inch circle from a scrap of cardstock (by hand or using dies) and coat with glue. Position palm truck and fronds in position on circle and firm down to secure.

Attach palm tree to back panel of card - make sure you measure height of card with palm added so you don't make it too tall for your envelope. Attach pterodactyl on back panel too.

To mount the other dinosaurs, cut two pieces of Pretty Peacock card stock 1 1/2 inches x 3 1/2 inches and score at 1/2 inch and 3 inches to create square C-shape brackets. 


Attach the diplodocus to one bracket so it will sit slightly to the right side of your card, looking left and the T-Rex to the other bracket, towards the right end, looking right. I use small strips of clear acetate to glue my figures in position.

Attach the decorated brackets inside your card with the T-Rex at the front and Diplodocus at the back. You may want to mount the second bracket slightly higher so this dinosaur can be seen.


I also add a strip of white cardstock to the back of all my box cards for personal messages. You can decorate this panel is desired.


This is a fun card, quick to make and easy to embellish and customise. I hope you enjoy making and giving it as much as I did. For full assembly instructions please watch my Facebook live below.


For everything you need to make this card at home please go to my online store HERE or follow the individual links below and to make sure you don't miss future blogs, please subscribe today.

Happy Crafting!

Product List 


Dino Days Bundle
$88.00
Dinoroar Designer Series Paper
$20.00
Pretty Peacock A4 Cardstock
$15.25
Whisper White A4 Card Stock
$17.00
Pretty Peacock Classic Stampin’ Pad
$13.00
Mango Melody Classic Stampin' Pad
$13.00
Pool Party Classic Stampin' Pad
$13.00
Lovely Lipstick Classic Stampin' Pad
$13.00
Old Olive Classic Stampin' Pad
$13.00
Soft Suede Classic Stampin' Pad
$13.00
Multipurpose Liquid Glue
$7.00

Comments

Popular posts from this blog

Reverse gate fold card featuring the Holly Jolly Christmas Bundle from Stampin Up!

Hello and welcome to my blog. Today I feature a reverse gate fold card using the adorable Holly Jolly Christmas Bundle and Night Before Christmas designer series paper. I like the reverse gate fold card as it highlights the central panel allowing the image to really pop out when on display. With normal orientation gate cards the central image is hidden behind the folds. The Holly Jolly Christmas Bundle is wonderful. Santa has so much personality and the other image match perfectly. See the link to my online store at the end of this blog to purchase this bundle and the other products featured in my blogs. To make this card you need cardstock and paper cut as follows:  Cherry Cobbler cardstock 11in x 4 1/8in. Scored at 2 3/4in, 4 1/8in. 6 7/8in and 8 1/4in Very Vanilla cardstock 3 7/8in square. Very Vanilla cardstock 2 layers at 3 7/8in x 2 1/2in Night Before Christmas DSP 3 5/8in square Santa's Workshop DSP 3 5/8in x 2 1/4in Cherry Cobbler cardstock circle 2 7/8in d...

Z-fold card featuring Wonderful Romance Bundle from Stampin Up!

Hello and welcome to my blog. Today I feature the beautiful Wonderful Romance Bundle with a lovely z-fold card in Petal Pink. To make this card cut a piece of Petal Pink cardstock 11 5/8" x 6". Score at 3 7/8" and 7 3/4" along the long edge. Mark one 6" edge at 3 1/2" and cut from the opposite top corner to this mark to create angle. See diagram below: Using a lead pencil draw a light line 1 5/8" from angle. This will be your guide for die cutting the decorative edge. Using the guide line run the leaf edge die thru your Bigshot, starting at narrow edge. Carefully align the beginning of the die with the end of the previous cut to avoid doubling up. Remove the small cut outs. Card should look like this. Cut 3 pieces of matching paper measuring 3 3/4" wide and as high as the highest point of each of the three panels of your card. Here my three panels are 2 5/8" x 3 3/4", 3 1/2" x 3 3/4" and 4 1/4...

Exploding Box Card featuring Happiness Surrounds Stamp Set and SnowFall ...

Hello and Welcome to my blog. Today I'm sharing the measurements and products used in this glorious exploding box card. To see the card being assembled please follow the link below to my YouTube channel or go to my Facebook page to watch a replay of the FBLive. Enjoy! To make this card you need to cut (a lot!): Bermuda Bay cardstock - 8 1/4 inches square, score at 2 3/4 inches and 5 1/2 inches in both directions to form 3x3 grid Bermuda Bay cardstock - 7 7/8 inches square, score at 2 5/8 inches and 5 1/4 inches in both directions to form 3x3 grid Bermuda Bay cardstock - 7 1/2 inches square, score at 2 1/2 inches and 5 inches in both directions to form 3x3 grid For lid, cut 5 inch square of Bermuda Bay cardstock score one inch from each edge and then diagonally from intersection to corner (see pic). Cut the corner panels from your 3x3 grids to form crosses. To decorate you need to cut: Silver Foil Sheet - 9 at 2 1/2 square, 4 at 2 3/8 square and 5 at 2 1/4...