Box Card featuring Magical Day stamp set
by Stampin' Up
Today I combined two of my favourite things - the box card and Stampin' Up's Magical Day Stamp Set.
I was aiming to make a bright colourful child's box card which fits in a standard A6 envelope (for cheaper postage) and I think this one ticks all the boxes.
The box itself is a standard pattern - you could probably find a million templates online - but here are the specifications for this project.
Start with a piece of black cardstock cut to 5 3/4 inches x 8 1/2 inches (this is half an A4 sheet for convenience). Score lengthways in half and at 2 inches, 4 inches, 6 inches and 8 inches in the opposite direction
Cut to centre on each vertical score line and removed the smallest flap as below. This makes a tab for gluing.
Construct card by gluing tab to opposite end and folding down 3 of the four flaps.
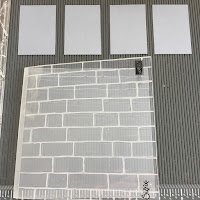
Cut 4 pieces of grey card stock to 1 7/8 inches x 2 3/4 inches and emboss using brick pattern embossing folder (here I've used the Stampin' Up Brick Wall Textured Impressions Embossing Folder).
Glue these panels to the front ,side and back tabs of your card. Your castle is taking shape!
At some stage you must stamp, colour and cut out the wizard, knight, mermaid and dragon from the stamp set. I have to admit that, because I make these cards for sale, I have used my digital cutting machine to cut the stamped images here. The same effect can be obtained cutting by hand, with patience and a good eye.
I have coloured my characters with Stampin Blends but pencils or other markers would be just as lovely.
Now (and this may be a bit heartbreaking) remove the mermaid's tail around where her scales start and create a small window for her to gaze longingly from, waiting for her prince to come. I have cut a piece of black card stock 1 inch x 3/4 inch for window and embossed grey cardstock 1 inch x 3/8 inch for window ledge. Assemble so window ledge conceals cut edge of mermaid.
Attach wizard to front flap, stamp with magical stars from stamp set and add embellishments if desired.
To mount dragon and knight, cut two pieces of black card stock 2 inches x 3 inches and score at 1/2 inch and 2 1/2 inches to create square C-shape. Attach dragon and knight to individual supports (I have used some trusty clear acetate) and secure inside box.
At this stage I thought card was a bit bare so have added some bushes from the "Let the Good Times Roll" bundle to the front and near the knight. The bushes have been stamped in Bermuda Bay and Lemon Lime Twist ink.
I also add a strip of white cardstock to the back of all my box cards for personal messages.
This is a fun card, quick to make and easy to embellish and customise. I hope you enjoy making and giving it as much as I did.
Foe everything you need to make this card at home please go to my Stampin' Up Demonstrator Page
and to make sure you don't miss future blogs, please subscribe today.
Happy Crafting!


Comments
Post a Comment